Colored Pencil Instruction
This colored pencil instruction will teach you some basic colored pencil techniques that will have you creating fabulous colored pencil art in no time!

These basic colored pencil techniques form the foundation for any type of colored pencil art that you would like to create.
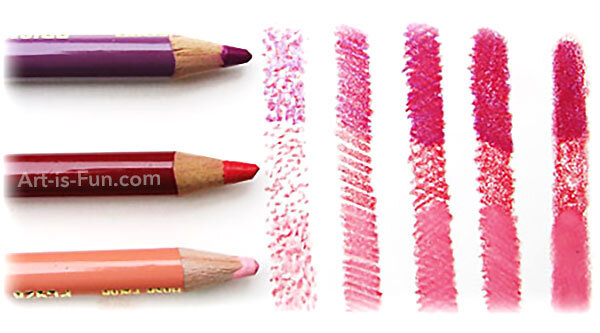
These colored pencil techniques cover the 5 main ways that you make marks with colored pencils: stippling, hatching, cross-hatching, back and forth stroke, and scumbling, etc. You can see examples of these 5 techniques on the left!
Once you master these colored pencil techniques, you can use these colored pencil techniques to layer colors over top of one another to create a rich, luminous depth.
New to colored pencils? Here are 8 colored pencil techniques you need to know.
Back and Forth: This coloring technique is so basic you’ve undoubtedly done it before; simply move your pencil back and forth in one continuous motion on the paper until you cover the entire area.
Hatching: Hatching is an approach that you can use in all facets of drawing. To create it, make parallel lines on your paper. They can be vertical, horizontal, or angled, just as long as they don’t touch. Unlike the back and forth method, you will pick up your pencil to create each new line.
Cross Hatching: Cross hatching is the cousin to hatching, but instead of parallel lines, you form intersecting lines (hence the name). This technique is ideal for creating shading and texture. To ensure that your cross hatching will appear clean and precise, make sure you’ve got a sharp point on your pencil.
Burnishing: One of the most defining characteristics of colored pencil art is its smooth, waxy finish. To achieve this, try burnishing—apply thin layers of color with the back-and-forth technique. Continue this process until the paper has a noticeable sheen. You can also use a tortillion to help in this process.
Scraping: Scraping can only happen from burnishing. Once you’ve got a lustrous area, take an X-ACTO knife and scrape away at the parts that you want to remove. This technique will probably look scratchy, so make sure you use it in places you want to be highly textured—such as animal fur.
Oil or Alcohol: Rubbing alcohol or baby oil can alter the appearance of your colored pencils. With a cotton swab, soak it in either one of the materials and rub it on your drawing. The effect will smear and blend the pigment.
Watercolor Wash: Break out your watercolor paints for this mixed-media approach! Begin painting a layer of watercolor on your paper. Once dry, use any one of the coloring techniques with colored pencils on top of it.
Rubbing: Many of these approaches challenge you to create your own texture—but not rubbing. Find a tactile item like seashells or coins and place a piece of paper on top of them. Then, using your colored pencil, move it back and forth across the object. Its ridges and other bumps will show through. For rubbings, you’ll want to use thinner paper; thicker paper is less likely to capture all of an object’s fine details.
It’s important to try a variety of coloring techniques with your colored pencils. Doing so will allow you to fully explore the media and determine what you like the best; you might be surprised with what strikes your fancy. And even if you don’t use an approach right away, you can keep it in mind for future projects. You never know when it might come in handy.


