Wednesday, June 10, 2020

THE HOPE OF ART


The best pencils for colouring, drawing and sketching etc.


The best pencils for artists and designers aren't easy to find in a crowded and confusing market... so I've done the work for you. After scouring the land for high quality pencils that offer durability, comfort and good value for your money, I can now present our selection of the best pencils around. So whether you're a total beginner, a professional artist, or somewhere in between, you should find what you're looking for on this list.

The best pencils for drawing and sketching


Best pencils: Three Palomino Blackwing pencils


Palomino Blackwing pencils


In the pencil world, Blackwing has an impressive pedigree. It developed something of a cult following before being discontinued in 1998. In 2010, Palomino bought the brand, and the result is more than worthy of the Blackwing name. There are three main pencil options to choose from: the Blackwing (similar to a 5B), Blackwing Pearl (4B) and Blackwing 602 (3B). The leads have wax added to them, making them super-smooth to use, and create velvety dark marks. 


Best pencils: Caran D'ache Graphite Line

Caran D'ache Graphite Line


Best pencils: Lyra Rembrandt Art Design Graphite Pencil Set tin 

Lyra Rembrandt Art Design


Best pencils: Derwent Graphic Medium pencils

Derwent Graphic Medium pencils

Best pencils: Cretacolor charcoal powder


 Cretacolor charcoal powder


The best pencils for colouring


Best pencils for designers and artists: Derwent Lightfast

Derwent Lightfast Pencils


Best pencils: Colourful tins of Prismacolor Premier coloured pencils


Prismacolor Premier coloured pencils


The best watercolour pencils


Best pencils: Staedtler Karat Aquarell watercolour pencils

 Staedtler Karat Aquarell watercolour pencils

Best pencils: Box of Albrecht Dürer watercolor pencils, with watercolour brushes and an artworkAlbrecht Dürer watercolor pencils


PASTEL PENCILS


Best pencils: Stabilo CarbOthello pastel pencils

 Stabilo CarbOthello pastel pencils

 The 24-pencil set includes a decent spectrum of colours, and the pencils sharpen very well. The pencils' dry stroke is perfect for blending, but the fun really starts when you begin adding water – you can create some particularly interesting results by working in wet areas with dry pencils. This is a great mid-level set of pencils, but might be a bit advanced for beginners.


Thursday, June 4, 2020

Colored Pencil Art


Colored Pencil Instruction

This colored pencil instruction will teach you some basic colored pencil techniques that will have you creating fabulous colored pencil art in no time!


Colored Pencil Instruction by Thaneeya
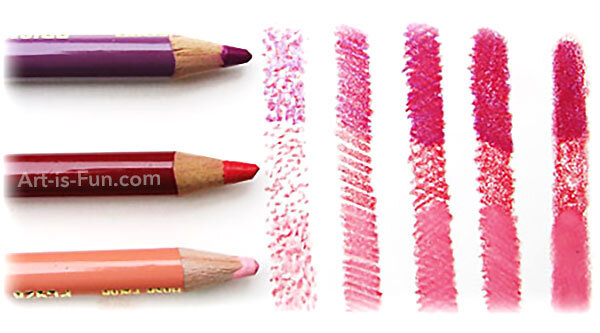
These basic colored pencil techniques form the foundation for any type of colored pencil art that you would like to create.
These colored pencil techniques cover the 5 main ways that you make marks with colored pencils: stippling, hatching, cross-hatching, back and forth stroke, and scumbling, etc. You can see examples of these 5 techniques on the left!
Once you master these colored pencil techniques, you can use these colored pencil techniques to layer colors over top of one another to create a rich, luminous depth.

New to colored pencils? Here are 8 colored pencil techniques you need to know.


Back and Forth: This coloring technique is so basic you’ve undoubtedly done it before; simply move your pencil back and forth in one continuous motion on the paper until you cover the entire area.
Hatching: Hatching is an approach that you can use in all facets of drawing. To create it, make parallel lines on your paper. They can be vertical, horizontal, or angled, just as long as they don’t touch. Unlike the back and forth method, you will pick up your pencil to create each new line.
Cross Hatching: Cross hatching is the cousin to hatching, but instead of parallel lines, you form intersecting lines (hence the name). This technique is ideal for creating shading and texture. To ensure that your cross hatching will appear clean and precise, make sure you’ve got a sharp point on your pencil.
Burnishing: One of the most defining characteristics of colored pencil art is its smooth, waxy finish. To achieve this, try burnishing—apply thin layers of color with the back-and-forth technique. Continue this process until the paper has a noticeable sheen. You can also use a tortillion to help in this process.
Scraping: Scraping can only happen from burnishing. Once you’ve got a lustrous area, take an X-ACTO knife and scrape away at the parts that you want to remove. This technique will probably look scratchy, so make sure you use it in places you want to be highly textured—such as animal fur.
Oil or Alcohol: Rubbing alcohol or baby oil can alter the appearance of your colored pencils. With a cotton swab, soak it in either one of the materials and rub it on your drawing. The effect will smear and blend the pigment.
Watercolor Wash: Break out your watercolor paints for this mixed-media approach! Begin painting a layer of watercolor on your paper. Once dry, use any one of the coloring techniques with colored pencils on top of it.
Rubbing: Many of these approaches challenge you to create your own texture—but not rubbing. Find a tactile item like seashells or coins and place a piece of paper on top of them. Then, using your colored pencil, move it back and forth across the object. Its ridges and other bumps will show through. For rubbings, you’ll want to use thinner paper; thicker paper is less likely to capture all of an object’s fine details.
It’s important to try a variety of coloring techniques with your colored pencils. Doing so will allow you to fully explore the media and determine what you like the best; you might be surprised with what strikes your fancy. And even if you don’t use an approach right away, you can keep it in mind for future projects. You never know when it might come in handy.


Monday, May 25, 2020

Still life." What a lie. Life isn't still, Death is.


    Still life." What a lie. Life isn't still, Death is.


"It relaxes my mind to paint flowers. I do not bring to it the same tension of spirit as when I am in front of a model. When I paint flowers, I arrange the tones, I try out different values boldly, without worrying about wasting a canvas.”

"What seems to me to be one of the most important things about our movement is that we have freed painting from the tyranny of subject-matter. I am free to paint flowers and call them flowers, without having to weave a story round them.”


Friday, May 8, 2020

Portrait – Art Term


                      PORTRAIT                                        

A portrait is a representation of a particular person. A self-portrait is a portrait of the artist by the artist.

The purpose of a portrait is to memorialize an image of someone for the future. It can be done with painting, photography, sculpture, or almost any other medium.
Some portraiture is also created by artists purely for the sake of creating art, rather than working on commission. The human body and face are fascinating subjects that many artists like to study in their personal work.


Types of Portraits in Art


  • Portraiture as Sculpture

While we tend to think of a portrait as a two-dimensional piece of artwork, the term can also apply to sculpture. When a sculptor focuses on just the head or the head and neck, it is called a portrait

  • Representative Portraiture

Sometimes a portrait includes inanimate objects that represent the subject's identity. It doesn't necessarily have to include the subject itself.
Francis Picabia's portrait of Alfred Stieglitz "Ici, C'est Ici Stieglitz" ("Here is Stieglitz," 1915, Stieglitz Collection, Metropolitan Museum of Art) depicts only a broken bellows camera. Stieglitz was a famous photographer, dealer, and Georgia O'Keeffe's husband. The early twentieth-century Modernists loved machines and Picabia's affection for both the machine and Stieglitz is expressed in this work.

  • The Size of Portraits
Portraiture can come in any size. When a painting was the only way to capture a person's likeness, many well-to-do families chose to memorialize people in "portrait miniatures." These paintings were often done in enamel, gouache, or watercolor on animal skin, ivory, velum, or a similar support. The details of these tiny portraits—often just a couple of inches—are amazing and created by extremely talented artists.
Portraits can also be very large. We often think of paintings of royalty and world leaders hanging in enormous halls. The canvas itself can, at times, be larger than the person was in real life.
However, the majority of painted portraiture falls in between these two extremes. Leonardo da Vinci's "Mona Lisa" (ca. 1503) is probably the most famous portrait in the world and it was painted on a 2-foot, 6-inch by 1-foot, 9-inch poplar panel. Many people do not realize how small it is until they see it in person.


Thursday, April 30, 2020

TIPS FOR DRAWING PORTRAITS IN PENCIL


 PORTRAIT SKETCHES 


Drawing self-portraits can be a great way to practice sketching techniques as-let’s face-it-there is no shortage of material when you draw yourself! Sketching or drawing yourself can be a great way to learn a lot about sketching, shading and proportions. And, when you sketch, your pictures can be kinda funny-they don’t always represent a subject the same way. But, making a sketch of yourself, whether you use a picture or look in a mirror, can teach you a lot about art and yourself. So here are some tips on how to draw your own self-portrait:


1. Start with a light sketch.

Start with a light outline. Everyone thinks they know the proportions of a face, but when you really study the human face, its easy to realize that the eyes are not near the top of the head, they are more about half-way between the crown of the head and your chin. Get the major features first, lightly, to create a foundation so you can add in your details later. This way, if you make a mistake, you can easily erase it and it wont affect the minute details you will spend more time creating later on.

2. Add shadows and smudge them.

To make your sketch look professionally done, add shadows. You will want to go lightly here as well. To create realistic shadow effects, use a smudging tool or your finger to draw out the shadows. This will blend the medium you use whether it is graphite, charcoal, or pastel and your shadows will end up lighter and easier to clean up in case you make a mistake. Lighting is important in finding shadows and one of the best ways to properly “light” yourself is use top-lighting or lighting from above. This is something to take into consideration when you take the photo you will use to do your self-portrait, during your set-up if you plan to use a mirror.

3. Do your hairline after you outline.

Start with the head and work out the proper length. Fill in with thick lines, then add shadowing and highlights as you go along.

4. Fine details come last.


After you have the outline and some of the shading done, its time for the fine details. Take some time filling in places in the eyes and lips, and also add some more shadowing to the neck so that your face doesn’t have the appearance of floating in thin air. The finer details are the ones which really lend to the realistic quality of a self-portrait. And, a little extra tip, (4.5) if you’ve used pencil, you can add some color at this point with colored pencils or even watercolors.

5.  Choose a good frame.


Example:-

If you like your portrait, choose a great frame for it. A nice frame can complement your art nicely and highlight your sketching skills. A simple black frame is nice when using charcoal, or something made of light wood goes best with soft colors.
And if you ever get tired of drawing your own image, you can always get together with a friend and practice drawing portraits of each other. Or, do a portrait of yourself and have your friend do one of you as well. Don’t look while they are in progress, but afterwards, compare and contrast. Our perspectives can vary much from individual to individual. Give it a try!

Wednesday, April 22, 2020

Make Your Sketch More


 Detailed With These Tips 

Drawing Hair in Graphite and Colored Pencil

When it comes to creating realistic portraits and figures, knowing techniques for drawing hair — including different lengths, styles and texture — is essential. If you’re a beginner, this may seem like a daunting challenge — especially since this task can take longer than any other part of a drawing.


Below are a few segment drawings that show different types of hairstyles and textures. Doing small studies such as these can give you good practice with various techniques.


 here are some essential tips for drawing hair:
  • The pencil strokes always replicate the hair’s direction and the length.
  • The color of the hair is determined by how dark or how light your pencil lines are.
  • A band of light is created in the hair anytime there is a curved area. You will see it in curls and around the circumference of the head.
  • Highlights are always seen on rounded or protruding areas.
  • Blend the paper to a gray tone before you lift highlights. This makes them look like they are on the outer surface.

Drawing Hair | Graphite

There are many different types of hairstyles and textures. 

  • Frizzy or Permed Hair

This study shows what frizzy or permed hair looks like. The curls are less distinct here because of the randomness of the hair direction and the overlapping of hair strands.
The pencil strokes are more blended out because of the frizzier texture of the hair. This hair appears much lighter than the previous example.

  • Curly Hair

This study shows how curls form tubular shapes similar to a cylinder. Wherever the curls protrude the most, the highlight shows.
The pencil lines create the texture of the hair, following the direction the hair is going. The highlights are lifted with the same type of quick stroke. You can tell this is dark hair by the depth of the tones.

  • Band of Light

This is an example of the bands of light — areas where the hair is curved, such as in bangs and around the head. It is the most obvious with long, smooth hair.

  • Layered Hair

In layered hair, V shapes are created — which also occurs when drawing animal fur, feathers and flower petals. These V shapes are where things overlap and recede, and the deep V of darkness gives the illusion of depth.

These quick exercises below will give you some practice with some of the most common styles.
Each type requires a different approach. The texture and color are dependent on the type of pencil stroke used and the pressure applied.
Materials you’ll need:
  • Drawing paper
  • Kneaded eraser
  • Mechanical graphite pencil
  • Stump or tortillion

From short to long and curly, drawing hair with these tips will make your drawings more realistic and accurate. Practice drawing different textures, colors and lengths to perfect your hair drawings. Then, combine facial features with your drawings to create realistic portraiture! Drawing hair is the first step to creating stunning and accurate portrait and figure drawings. Understanding how hair is drawn and behaves may even help you draw animals! The possibilities are endless with Lee Hammond’s essential tips for drawing hair. 

Friday, April 17, 2020

देखो ना कान्हा में मेरे,, कितने गुण समाये हैं…...


 माना ज़रा सा नटखट है वो
निराली उसकी अदाये हैं,
देखो ना कान्हा में मेरे
कितने गुण समाये हैं…

कृष्ण-कन्हैया, मुरली बजैया
माखन चोर कहलावे है,
उठा के एक उंगल पे अपनी
पर्वत गोवर्धन दिखलावे है…

गोपियो संग रास रचावे
घाट-घाट पे घुमे है,
ले मदमस्त ग्वालो की टोली
गोकुल-गलियन में झुमे है…

जीवन जीने के सही मायने
गीता-उपदेश में सिखाये हैं,
देखो ना कान्हा में मेरे
कितने गुण समाये हैं…

Monday, April 13, 2020

Maan ki Bechani


 होना होगा एक संग, जब जंग हो कोरोना के संग !!


 Dil  kahe , udd chalu aasma mein 
 Dil  kahe , jhoom loon iss jahan mein

Par ye pal kyu h kafa mujhse ,,
Ye sach bhi hai , ya koi bharam ..

Koi ye batae mujhe , kyu hoon dara dara sa mein ,,
Khwashiye jahase ye kahegi , dhoond lo wapis wo kahin ,,
chipi hui si kyu hai wo kahin , Man kahe ki tod doon ye duriyaan ...

mushkil se milli hai ye zindagi , kyu gawau ek pal bhi khoof se ,,
Prakarti ne liye hai ye imtehaan , Kar dikhau samna mein josh se ..

IF YOU WIN OVER YOUR MIND , YOU WIN OVER WHOLE WORLD.
        WE NEED TO SHIFT OUR FOCUS TOWARDS POSITIVE .

ITNA BHI TUM DARONA
  MANNATE TUM KARONA
   BHAAG JAYEGA CORONA
    TUM BAS HASTE RAHONA 

  Lets Fight The Fear To Save Our World 
           
 SAVE OUR SELVES
SAVE OUR FAMILY
   SAVE OUR COUNTRY
            SAVE OUR WORLD ............

Thursday, April 2, 2020

Listen to the earth. Listen to your soul.


 ...Stay home  Stay safe...
 

The earth whispered but you did not hear. 
The earth spoke but you did not listen.
 The earth screamed but you turned her off. 
And so I was born...
Because you didnt Listen 

I was not born to punish you.. 
I was born to awaken you..

The earth cried out for help...

Massive flooding. But you didn't listen. 
Burning fires. But you didn't listen. 
Strong hurricanes. But you didn't listen. 
Terrifying Tornadoes. But you didn't listen. 

You still don't listen to the earth when ocean animals are dying due to pollutants in the waters. 
Glaciers are melting at an alarming rate. 
Severe drought. 

You didn't listen to how much negativity the earth is receiving.

Non-stop wars. 
Non-stop greed. 

You just kept going on with your life.
No matter how much hate there was.
No matter how many killings daily.

It was more important to get that latest iPhone than worry about what the earth was trying to tell you.

But now I am here! 

And I've made the world stop on its tracks. 
I've made YOU finally listen. 
I've made you take refuge. 
I've made you stop thinking about materialistic things.

Now you are like the earth... 
You are only worried about YOUR survival. 

How does that feel?  

I gave you fever... as the fires burn on earth. 
I gave you respiratory issues... like pollution fill the earth air. 
I gave you weakness as the earth weakens every day.  

I took away your comforts.
Your outings.  
The things you would use to forget about the planet and its pain.  

And I made the world stop.

*And now... *

China has better air quality. 
Skies are clear blue because factories are not spewing pollution unto the earth's air. 

The water in Venice is clean and dolphins are being seen. Because the gondola boats that pollute the water are not being used.  

YOU are having to take time to reflect on what is important in your life.  

Again I am not here to punish you. I am here to Awaken you.

When all this is over and I am gone, Please remember these moments... 

LISTEN


Listen to the earth. 
Listen to your soul. 
Stop Polluting the earth. 
Stop Fighting among each other. 
Stop caring about materialistic things. 
And start loving your neighbors. 
Start caring about the earth and all its creatures.  
Start believing in the Creator. 

Because next time I may come back even stronger...........


Thursday, March 26, 2020

STILL LIFE PAINTING


                       VASE  OF  FLOWERS


still life (plural: still lifes) is a work of art depicting mostly inanimate subject matter, typically commonplace objects which are either natural (food, flowers, dead animals, plants, rocks, shells, etc.) or man-made (drinking glasses, books, vases, jewelry, coins, pipes, etc.).
                                                                      One advantage of the still-life art form is that it allows an artist a lot of freedom to experiment with the arrangement of elements within a composition of a painting.


Who painted the first still life?

Jacopo de'Barbari
The painting generally considered to be the first still life is a work by the Italian painter Jacopo de'Barbari painted 1504. The “golden age” of still-life painting occurred in the Lowlands during the 17th century.


Still-life paintings often adorn the interior of ancient Egyptian tombs. It was believed that food objects and other items depicted there would, in the afterlife, become real and available for use by the deceased. Ancient Greek vase paintings also demonstrate great skill in depicting everyday objects and animals. Peiraikos is mentioned by Pliny the Elder as a panel painter of "low" subjects, such as survive in mosaic versions and provincial wall-paintings at Pompeii: "barbers' shops, cobblers' stalls, asses, eatables and similar subjects".[4]


This painting includes all kinds of man-made or natural objects, cut flowers, fruit, vegetables, fish, game, wine and so on. Still life can be a celebration of material pleasures such as food and wine, or often a warning of the ephemerality of these pleasures and of the brevity of human life (see memento mori).

The magic of still life paintings is that they can show us a new way of looking at the ordinary objects around us.


The inanimate objects selected for still life art can show cultural, philosophical level, religious, societal, and cultural values. It provokes introspection and a viewer's reflection. It shows multiple emotions and arrangements, citing color, lighting, and handling.

In the hierarchy of genres (or subject types) for art established in the seventeenth century by the French Academy, still life was ranked at the bottom – fifth after history paintingportraituregenre painting (scenes of everyday life) and landscape. Still life and landscape were considered lowly because they did not involve human subject matter.

Featured Post

Symbol of Birth

CLIMATE HEALERS What does a peacock feather symbolise? Peacock Feather Symbolism Peacock feathers, or mor pankh, are regarded as an auspicio...